
Configure Gmail Account Settings
Setting up your Gmail account correctly is crucial to ensure smooth synchronization between Gmail and your Mac’s Mail application. Follow the steps below to configure your Gmail account settings:
1. Sign in to your Gmail account: Go to the Gmail website (www.gmail.com) and enter your email address and password.
2. Access the settings: Once you’re logged in, click on the gear icon in the top right corner of the Gmail interface. From the drop-down menu, select “Settings”.
3. Enable IMAP: In the Gmail Settings page, navigate to the “Forwarding and POP/IMAP” tab. Under the “IMAP Access” section, make sure the option “Enable IMAP” is selected. This allows the Mail application on your Mac to access your Gmail account.
4. Save changes: Scroll down to the bottom of the page and click on the “Save Changes” button to apply the configuration.
By enabling IMAP, you ensure that your Gmail account is set up to work with third-party email clients like the Mac’s Mail application. This enables a two-way synchronization between your Gmail account and the Mail application, allowing you to send, receive, and manage your email seamlessly.
Once you have configured the necessary settings in your Gmail account, you can proceed to set up your Gmail account in the Mail application on your Mac. This will enable you to access and manage your Gmail emails directly from the Mail application, providing a more integrated and convenient email experience.
Enable IMAP in Gmail Account
IMAP (Internet Message Access Protocol) allows you to access your Gmail account from various devices and email clients while keeping your emails synchronized across all platforms. Follow the steps below to enable IMAP in your Gmail account:
1. Sign in to your Gmail account: Go to the Gmail website (www.gmail.com) and enter your email address and password.
2. Access the settings: Once you’re logged in, click on the gear icon in the top right corner of the Gmail interface. From the drop-down menu, select “Settings”.
3. Navigate to the “Forwarding and POP/IMAP” tab: In the Gmail Settings page, click on the “Forwarding and POP/IMAP” tab at the top of the settings menu.
4. Enable IMAP: Under the “IMAP Access” section, select the option “Enable IMAP” to allow IMAP access for your Gmail account.
5. Save changes: Scroll down to the bottom of the page and click on the “Save Changes” button to save your settings.
Enabling IMAP in your Gmail account allows you to access your emails from different email clients, including the Mac’s Mail application. With IMAP, any changes you make to your emails (such as marking them as read, deleting, or moving to folders) will be synced across all devices and email clients, ensuring consistent access to your email no matter where you are.
Take advantage of IMAP to conveniently manage your Gmail account from your Mac’s Mail application and other email clients, ensuring seamless synchronization and access to your emails.
Open Mac’s Mail Application
The Mail application on your Mac provides a convenient and integrated platform to manage all your email accounts in one place. Follow the steps below to open the Mail application:
1. Locate the Mail application: The Mail application is typically found in the Dock at the bottom of your screen or in the Applications folder in Finder. You can also use Spotlight search (Command + Space) to quickly find and open the application.
2. Click on the Mail icon: Once you have located the Mail application, click on its icon to launch the application. The Mail application will open, and you will see the main interface with your existing email accounts, if any.
3. Verify Mail application version: It’s important to make sure you have the latest version of the Mail application installed on your Mac. To check for updates, click on the “Mail” menu at the top left of the screen, select “Check for Updates,” and follow the instructions to install any available updates.
Opening the Mail application is the first step in setting up your Gmail account on your Mac. Now that you have the application open, you can proceed to add your Gmail account and configure the necessary settings to start managing your Gmail emails directly from the Mail application.
The Mail application offers a user-friendly interface and powerful features, making it a convenient solution to handle your email communications efficiently. With the Mail application on your Mac, you can streamline your email management process, organize your inbox, and benefit from a seamless integration with other Apple devices and services.
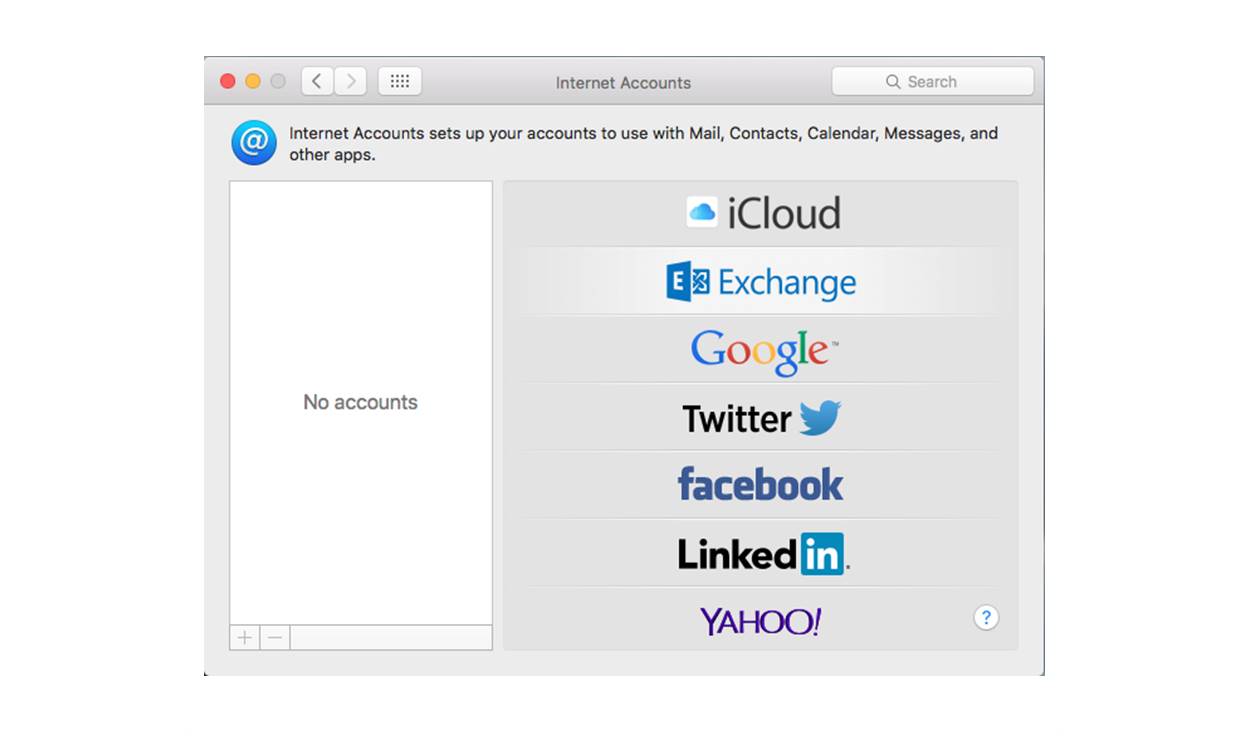
Add Gmail Account to Mail Application
Adding your Gmail account to the Mail application on your Mac allows you to access and manage your Gmail emails directly from the application. Follow the steps below to add your Gmail account:
1. Open the Mail application: Launch the Mail application on your Mac by clicking on its icon in the Dock or finding it in the Applications folder.
2. Access the Accounts window: Once the Mail application is open, click on the “Mail” menu at the top left of the screen, and select “Preferences” from the drop-down menu. A new window labeled “Accounts” will appear.
3. Add a new account: In the “Accounts” window, click on the “+” (plus) button at the bottom left corner to add a new account. A dialog box will appear where you can choose the type of account you want to add.
4. Select Gmail as the account type: From the account type options, select “Google” or “Gmail.” This will prompt you to sign in to your Gmail account.
5. Sign in to your Gmail account: Enter your Gmail email address and password in the provided fields and click “Next.” Follow any additional prompts to complete the authentication process.
6. Customize account settings (optional): You can customize various settings for your Gmail account, such as the description, whether to enable Notes and/or Contacts syncing, and the apps that can use the account.
7. Finish the setup: Once you have made any desired customizations, click on the “Add Account” button to complete the process. The Mail application will then sync your Gmail account data, including your inbox, sent items, and folders.
By adding your Gmail account to the Mail application, you can conveniently manage your Gmail emails alongside your other email accounts, streamlining your email management process and improving productivity.
Now that your Gmail account is successfully added to the Mail application, you can start accessing and managing your Gmail emails directly from the application, taking advantage of the many features and functions it offers for efficient email organization and communication.
Enter Gmail Account Details
After adding your Gmail account to the Mail application on your Mac, it’s important to enter the necessary account details to ensure proper synchronization and access to your emails. Follow the steps below to enter your Gmail account details:
1. Go to Mail Preferences: Open the Mail application on your Mac and click on the “Mail” menu at the top left of the screen. From the drop-down menu, select “Preferences” to open the preferences window.
2. Select the Accounts tab: In the preferences window, click on the “Accounts” tab. You will see a list of the email accounts you have added to the Mail application.
3. Choose the Gmail account: From the accounts list, select your Gmail account that you recently added. This will open the account details section.
4. Verify account details: In the account details section, ensure that the email address and description for your Gmail account are correct. You can edit them if needed.
5. Enter password: If you haven’t already entered your Gmail account password during the initial setup, you will see a field labeled “Password.” Enter your Gmail account password to authenticate the account.
6. Optional settings: On the same account details page, you may find additional settings such as email server settings, advanced options, or specialized configurations. Make any necessary modifications based on your preferences or specific requirements.
7. Save changes: Once you have entered all the necessary account details and made any desired changes, click on the “Save” or “OK” button to save the changes and apply the configurations to your Gmail account.
Entering your Gmail account details in the Mail application allows for seamless synchronization, ensuring that your emails, folders, and other account information are accurately reflected in the application.
Now that you have entered the Gmail account details in the Mail application, you can begin using the application to send, receive, and manage your Gmail emails right from your Mac, providing you with a centralized and efficient email management solution.
Configure Mail Application Settings
Configuring the settings in the Mail application on your Mac allows you to personalize the behavior and functionality of the application according to your preferences. Follow the steps below to configure the Mail application settings:
1. Access Mail Preferences: Open the Mail application on your Mac and click on the “Mail” menu at the top left of the screen. From the drop-down menu, select “Preferences” to open the preferences window.
2. General settings: In the preferences window, you will see various tabs for different settings. Start with the “General” tab, where you can customize options such as the default email client, default font, and the behavior of the application when receiving new messages.
3. Accounts settings: Next, navigate to the “Accounts” tab. Here, you can manage your email accounts, including adding more accounts, editing existing account details, or removing accounts from the Mail application.
4. Mailbox behaviors: Move on to the “Mailbox Behaviors” tab, where you can specify how the Mail application handles various actions like moving deleted messages to trash, archiving messages, or storing drafts.
5. Viewing preferences: In the “Viewing” tab, you can adjust settings related to the appearance of your emails, including the font style, message list preview options, and the layout of the Mail application interface.
6. Signatures and rules: Customize your email signature and create rules for sorting, filtering, or redirecting incoming messages in the “Signatures” and “Rules” tabs, respectively.
7. Advanced settings: Lastly, explore the “Advanced” tab to fine-tune advanced settings like SSL encryption, port configurations, or server settings for specific email accounts.
By configuring the Mail application settings, you can tailor the application to meet your specific email management needs and preferences. From general appearance and behavior to email organization and advanced options, the settings allow you to optimize your email experience on your Mac.
Take the time to review and adjust the Mail application settings according to your preferences, ensuring that the application works seamlessly with your Gmail account and provides you with a streamlined and personalized email management solution on your Mac.
Manage Gmail Account in Mail Application
Once you have successfully added and configured your Gmail account in the Mail application on your Mac, you can start managing your Gmail emails conveniently from the application. Here are some ways to effectively manage your Gmail account in the Mail application:
1. Read and compose emails: Use the Mail application to access your Gmail inbox and read your emails. You can compose new emails by clicking on the “New Message” button or by selecting “File” > “New Message” from the menu bar.
2. Organize with folders and labels: Create folders in the Mail application to organize your Gmail emails. You can either drag and drop emails into specific folders or use the “Move to” option to categorize them. The folders you create in the Mail application will sync with your Gmail account, preserving your organization across devices.
3. Use Smart Mailboxes: Smart Mailboxes in the Mail application allow you to create virtual folders that gather emails based on specific criteria, such as unread emails, flagged messages, or emails from specific contacts. Take advantage of these Smart Mailboxes to quickly access important emails without the need to manually search through your inbox.
4. Search and filter: Utilize the search function in the Mail application to find specific emails or filter your inbox based on various criteria. You can search by sender, subject, keywords, or dates to quickly locate the emails you need.
5. Manage attachments: Easily handle email attachments by previewing, saving, or sharing them directly from the Mail application. You can also drag and drop attachments from emails to your desktop or other folders for easy access.
6. Set up rules and filters: Use the Mail application’s rules and filters to automate email management tasks. You can create rules to automatically move certain emails to specific folders, mark them as read, or apply other actions based on predefined criteria.
7. Sync across devices: The Mail application syncs your Gmail account across all your Apple devices, allowing you to access your Gmail emails seamlessly from your Mac, iPhone, iPad, or iPod Touch. Any changes you make, such as reading or deleting emails, will be reflected across all devices.
By utilizing the features and functionalities of the Mail application, you can efficiently manage your Gmail account, organize your emails, and stay on top of your communication. Explore the various tools available in the Mail application to streamline your email workflow and make managing your Gmail account a breeze.
Troubleshoot Gmail Account Connection Issues
If you encounter connection issues with your Gmail account in the Mail application on your Mac, there are several steps you can take to troubleshoot and resolve the problem. Here are some common troubleshooting techniques:
1. Check internet connection: Before troubleshooting the Gmail account connection, ensure that your Mac is connected to the internet. Verify your Wi-Fi or Ethernet connection and make sure you have a stable internet connection.
2. Verify Gmail account credentials: Double-check that you have entered the correct Gmail account credentials in the Mail application. Ensure that your email address and password are accurate.
3. Update Mail application: Check if there are any available updates for the Mail application. Outdated versions may have compatibility issues. Update the Mail application to the latest version from the App Store or Apple’s official website.
4. Restart Mail application and Mac: Close the Mail application and restart it. If the issue persists, try restarting your Mac. Sometimes, a simple restart can fix temporary connection problems.
5. Disable and re-enable Gmail account: In the Mail application’s preferences, go to the “Accounts” tab and select your Gmail account. Uncheck the box next to “Enable this account” and then check it again to re-enable the account. This can refresh the account settings and resolve connection issues.
6. Check Gmail server status: Occasionally, Gmail servers may experience temporary outages or downtime. Verify the status of the Gmail servers by visiting the Google Workspace Status Dashboard or other reliable sources. If there is a server issue, you may need to wait for it to be resolved by Google.
7. Remove and re-add Gmail account: As a last resort, you can remove the Gmail account from the Mail application and re-add it. This helps to create a fresh connection with the Gmail servers. However, be aware that removing the account will delete all associated emails and data from the Mail application.
If none of the troubleshooting steps resolve the Gmail account connection issues, you may need to seek further assistance. Contact Gmail support or Apple support for advanced troubleshooting to resolve the problem.
By following these troubleshooting techniques, you can address common connection problems and regain seamless access to your Gmail account through the Mail application on your Mac.