
What is the All Caps Shortcut Key?
When working with Microsoft Word, the All Caps shortcut key is a convenient tool that allows you to quickly convert text to uppercase letters. It is especially useful when you want to emphasize certain words or phrases, create headings in your documents, or adhere to specific formatting requirements. This shortcut key saves you time and effort by eliminating the need to manually change the case of each letter individually.
By using the All Caps shortcut key, you can instantly transform regular text into uppercase, giving it a bold and prominent appearance. Whether you need to create visually appealing titles, highlight important information, or maintain consistency in your document’s formatting, this shortcut key can help you achieve those goals with ease.
The All Caps shortcut key is not only limited to Microsoft Word; it is also commonly available in other text editing programs and graphic design applications. By familiarizing yourself with this powerful tool, you can streamline your workflow and enhance the overall presentation of your documents.
It’s important to note that the All Caps shortcut key is not a permanent formatting change. Instead, it applies a temporary formatting effect to the selected text, allowing you to easily toggle between uppercase and lowercase as needed.
How to Toggle All Caps On and Off?
To toggle the All Caps formatting on and off in Microsoft Word, you can follow these simple steps:
- Select the text that you want to convert to uppercase.
- Press the “Ctrl” + “Shift” + “A” keys simultaneously on your keyboard. Alternatively, you can also use the “Shift” + “F3” shortcut.
- The selected text will now be converted to uppercase if it was originally in lowercase or sentence case. If the text was already in uppercase, this shortcut will change it back to its original state.
By utilizing this handy shortcut, you can effortlessly switch between uppercase and lowercase lettering in Microsoft Word. Remember, this formatting change is temporary and can be easily toggled on and off as needed.
It’s important to use the All Caps formatting sparingly and with discretion. While it can be useful for headings, titles, and highlighting important information, excessive use of uppercase letters may negatively impact the readability of your document. Always consider the context, audience, and overall design aesthetics before applying the All Caps formatting.
Additionally, it’s worth noting that this toggle shortcut works within the scope of your selected text. If you want to apply All Caps formatting to only specific words within a sentence or paragraph, you can first select the desired text and then use the toggle shortcut to switch between uppercase and lowercase letters.
Now that you know how to toggle the All Caps formatting on and off, you can easily incorporate this feature into your Microsoft Word workflow, improving the visual impact and organization of your documents.
How to Quickly Convert Text to All Caps?
If you need to convert a significant amount of text to uppercase in Microsoft Word, there are a few methods you can use to quickly achieve this formatting change:
- Select the text that you want to convert to uppercase.
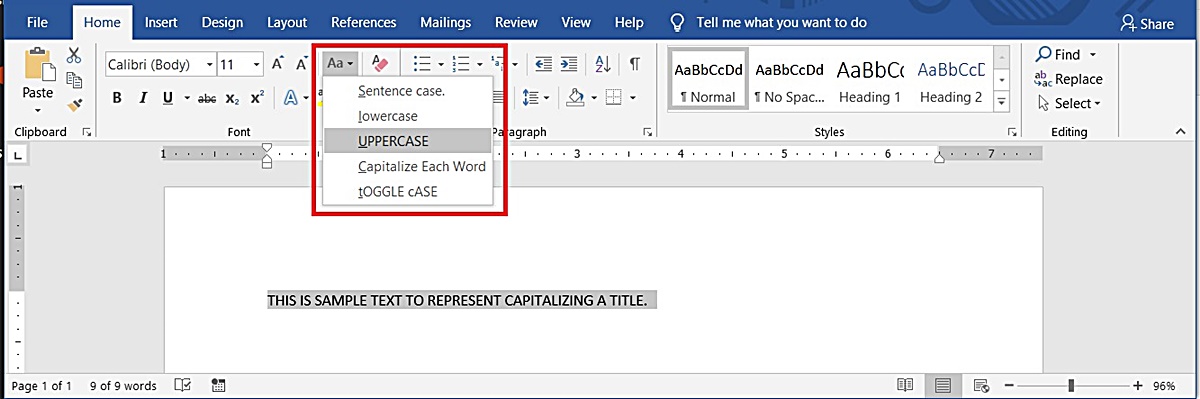
- Click on the “Home” tab in the Word ribbon.
- In the “Font” group, locate and click on the “Change Case” button.
- A drop-down menu will appear with different case options. Select “UPPERCASE” to convert the selected text to all caps.
Alternatively, you can use shortcut keys to perform the same action:
- Select the text that you want to convert to uppercase.
- Press the “Ctrl” + “Shift” + “K” keys simultaneously on your keyboard.
Both of these methods will convert the selected text to uppercase, allowing you to quickly apply the All Caps formatting without the need for manual modifications.
It’s worth noting that converting text to all caps using these methods is a permanent change. Unlike the toggle shortcut, the text will remain in uppercase even if you edit or modify it later. If you prefer a temporary formatting change, you can use the toggle shortcut mentioned in the previous section.
By leveraging these methods, you can save time and effort when you need to convert large portions of text to all caps in Microsoft Word. Whether you’re working on a report, presentation, or other document, these techniques will help ensure consistency and clarity in your formatting.
How to Apply All Caps to Selected Text?
If you want to apply the All Caps formatting to specific words or phrases within a paragraph or sentence in Microsoft Word, you can follow these steps:
- Select the text that you want to apply the All Caps formatting to.
- Right-click on the selected text, and a context menu will appear.
- In the context menu, click on “Font.”
- A popup window will open. Check the box that says “All caps” or “Small caps,” depending on your preference.
- Click “OK” to apply the All Caps formatting to the selected text.
Alternatively, you can also use the following method to apply All Caps formatting:
- Select the text that you want to apply the All Caps formatting to.
- In the Word ribbon, go to the “Home” tab and locate the “Font” group.
- Click on the small arrow button at the bottom-right corner of the “Font” group to open the “Font” dialog box.
- In the “Font” dialog box, check the box that says “All caps” or “Small caps.”
- Click “OK” to apply the All Caps formatting to the selected text.
These methods allow you to selectively apply the All Caps formatting to specific text within your document. Whether you want to emphasize a particular word, phrase, or heading, this technique gives you the flexibility to enhance readability and draw attention to important information.
Remember to use the All Caps formatting sparingly and strategically, ensuring that it serves a clear purpose and doesn’t hinder the overall readability of your text.
By utilizing these methods, you can easily apply the All Caps formatting to selected text in Microsoft Word, effectively enhancing the visual impact and organization of your document.
How to Use All Caps for Headings and Subheadings?
Using the All Caps formatting for headings and subheadings in your document can help create a visually appealing and organized layout. Here’s how you can apply All Caps to your headings and subheadings in Microsoft Word:
- First, select the heading or subheading text that you want to format.
- In the Word ribbon, go to the “Home” tab and locate the “Font” group.
- Click on the small arrow button at the bottom-right corner of the “Font” group to open the “Font” dialog box.
- In the “Font” dialog box, check the box that says “All caps” or “Small caps” to apply the desired formatting.
- Click “OK” to apply the All Caps formatting to the selected heading or subheading.
By converting headings and subheadings to All Caps, you create a consistent and professional look throughout your document. This formatting choice can make it easier for readers to identify and navigate different sections or levels of information.
Additionally, when using All Caps for headings and subheadings, it’s essential to consider other formatting elements such as font size, style, and color to create a visually appealing hierarchy. Experiment with different combinations to find the look that best suits your document and enhances readability.
Remember, while headin
Tips and Tricks for Using the All Caps Shortcut Key
When using the All Caps shortcut key in Microsoft Word, there are a few tips and tricks that can help you make the most out of this feature and improve your overall workflow:
- Use it sparingly: While the All Caps formatting can be effective for headings, titles, and emphasizing important information, it’s important to not overuse it. Excessive use of uppercase letters can make the text difficult to read, so reserve it for specific instances where it truly enhances the document’s visual impact.
- Proofread carefully: When applying the All Caps formatting, it’s crucial to proofread your text thoroughly. Uppercase letters can sometimes change the appearance of words, making it easier to miss typos or errors. Double-check for spelling mistakes, punctuation errors, and formatting inconsistencies after applying the All Caps formatting.
- Consider alternative formatting: Before using the All Caps formatting, explore other formatting options such as bold, italics, or underline to convey emphasis or hierarchy. Sometimes, a combination of different formatting styles can achieve the desired effect without relying solely on uppercase letters.
- Experiment with font styles: Not all fonts render uppercase letters in the same way. Some fonts may have more visually appealing uppercase characters, while others may look cramped or unbalanced. Experiment with different fonts to find the one that best complements the All Caps formatting and enhances the overall aesthetic of your document.
- Use in conjunction with other formatting tools: The All Caps formatting can work well when combined with other formatting tools such as font size, color, or highlighting. Experiment with different combinations to create impactful headings, subheadings, or call-out boxes that capture the reader’s attention.
- Create styles for consistent formatting: If you frequently use the All Caps formatting in your documents, consider creating a custom style that applies the formatting automatically. This can save you time and ensure consistency across your document by simply applying the style to the desired text instead of manually formatting each instance.
By keeping these tips and tricks in mind, you can effectively use the All Caps shortcut key in Microsoft Word to enhance the visual impact of your documents, emphasize important information, and maintain consistency in your formatting.